BOUNDARY DEFINER
Platform: Windows, MacOS
Enigne: Unity 2022
Language: C#
Duration: 5 months
Type of project: University
Completion: 2025
Team size: 4
Role: Team lead, programming, tool making
CHECK OUT THE TEAM
Want to learn more about the project? Read our devlog!
PROJECT OVERVIEW AND GOAL
This project was created by Team (NoNo)2 - a small multidisciplinary team, as a part of the IMT&S module at the Creative Media and Game Technologies course at Saxion University of Applied Sciences. The client for this project was Academie Creative Technologie at Saxion. The project aims to facilitate and normalise discussions around the sensitive topic of border-crossing behaviours.
The result was the Boundary Definer. It’s a gamified app that aims to help students and teachers learn about their personal boundaries and help them discuss complex topics in class. The app is divided into two parts - the admin version and the user version. The user version can be played in a browser, as not all participants might want to download the app. The admin version needs to be downloaded, as one of the functionalities is to add your own prompts. Sadly, creating this functionality during the web build was out of scope.
LEADERSHIP POSITION
This was the first project where I took the full leadership position. As the leader I tried to support my team and guide us into the best version of the product. My responsibilities were planning our work and communicating with the client. I also took responsibility for all design challenges that we made. Overall my team was happy with my work. The feedback I got was that I have to be even more interested in the work of my teammates, as during this project sometimes it was still not enough.
MY CONTRIBUTION
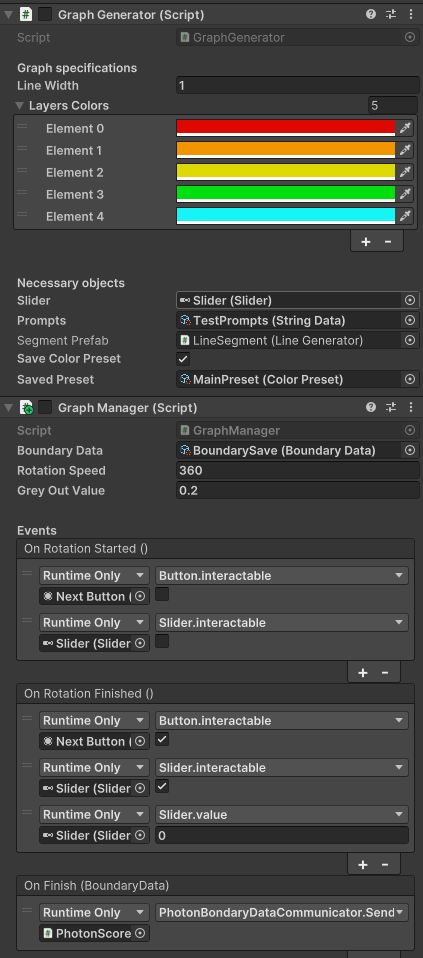
My primary focus was developing a tool for creating and customising graphs, a central component of our app. I aimed to make the tool intuitive and highly adjustable, allowing designers to create and modify graphs without editing the code. This approach ensured that team members could independently adjust the graph as needed, enabling smoother collaboration and reducing reliance on my availability for technical guidance.
The tool consists of two main scripts: one responsible for drawing the graph and another for managing its functionalities. I made sure that all necessary fields are exposed and easily modifiable through the Unity Inspector, making it simple for designers to work with.
Creating the graph is intuitive — designers only need to specify parameters such as the line width and colours, which also define the number of layers. The graph generator script provides clear feedback by informing users about any additional required objects to be assigned for successful graph generation. To further simplify usage, all exposed fields include tooltips to guide the user.
The second script, the manager, handles the manipulation of the graph and saves its data. It utilises events to manage interactions during the graph's rotation and triggers specific actions when it completes a full cycle. This event-driven approach ensures efficient control and responsiveness, improving the overall functionality of the tool.


Additionally, I wrote a few scripts that can be used in various places in the project.

In the application, we use a lot of procedurally generated content. I created a scriptable object called Color Preset to keep the style consistent. The preset is responsible for storing all the colours assigned to the graph and making it possible to access them. Thanks to these elements, like slider, graph, or end results, the same colour palette would always be used and wouldn’t have to be reassigned whenever the colours changed.

One of the mechanics of the application is constantly changing prompts. To allow the designer to easily decide what should happen when the prompts are done, I created a script with a list of events that would fire when the list of prompts is completed.


We wanted to give the user visual feedback of their answers on the slider next to the graph. To make the swap of animations or other objects easier, I created a script to choose the correct object from the list, depending on the slider's value. The script methods could be accessed by the slider event system.